Usage
Build Classifier
Builds text classifiers.
Before starting any classification you first need to train the classifiers.
Some pre-built models are stored in the models folder. But any changes to the classifier
configuration, the feature definition, or even the training data will require the classifiers to be re-built.
So let’s start with this step first.
Classifiers are built with the build_classifiers.py program:
$ ./twitter_ml/classify/build_classifiers.py

2019-11-12 18:48:51,480 - __main__ - INFO - Loading feature sets and training data...
Review extraction: 100%|███████████████████████████████████████████████████████████████████████████████████████████████████████████████████████████████████████████████| 1000/1000 [00:01<00:00, 804.53it/s]
Review extraction: 100%|███████████████████████████████████████████████████████████████████████████████████████████████████████████████████████████████████████████████| 1000/1000 [00:01<00:00, 746.02it/s]
Feature encoding: 100%|███████████████████████████████████████████████████████████████████████████████████████████████████████████████████████████████████████████████| 2000/2000 [00:00<00:00, 2347.35it/s]
2019-11-12 18:48:54,961 - __main__ - INFO - Creating classifiers...
2019-11-12 18:48:54,961 - twitter_ml.classify.sentiment - INFO - Training voting classifier
2019-11-12 18:48:55,519 - twitter_ml.classify.sentiment - INFO - Saving classifier to models/voting.pickle...
2019-11-12 18:48:55,520 - __main__ - INFO - Done.
This downloads a set of training data (the default configuration uses some on-line Movie Reviews shipped with the NLTK toolkit).
The program extracts a set of features from the data and uses this to build a classifier. The classifier is stored in the `model` folder.
The classifier is now ready to be used. If you want to start using it, jump ahead to the Text Classifier section.
build_classifiers.py also supports other command-line arguments:
$ ./twitter_ml/classify/build_classifiers.py -h

usage: build_classifiers.py [-h] [--features] [--report] [--graphs]

Builds scikit-learn/nltk classifiers based on training data.

optional arguments:
  -h, --help  show this help message and exit
  --features  list features and exit
  --report    print classifier metrics and exit
  --graphs    print classifier graphs and exit
  --learning  print classifier learning curves
The arguments are summarised below:
- features
- Lists the words that are extracted from the training data and exits. These words are the ‘features’ used to classify documents.
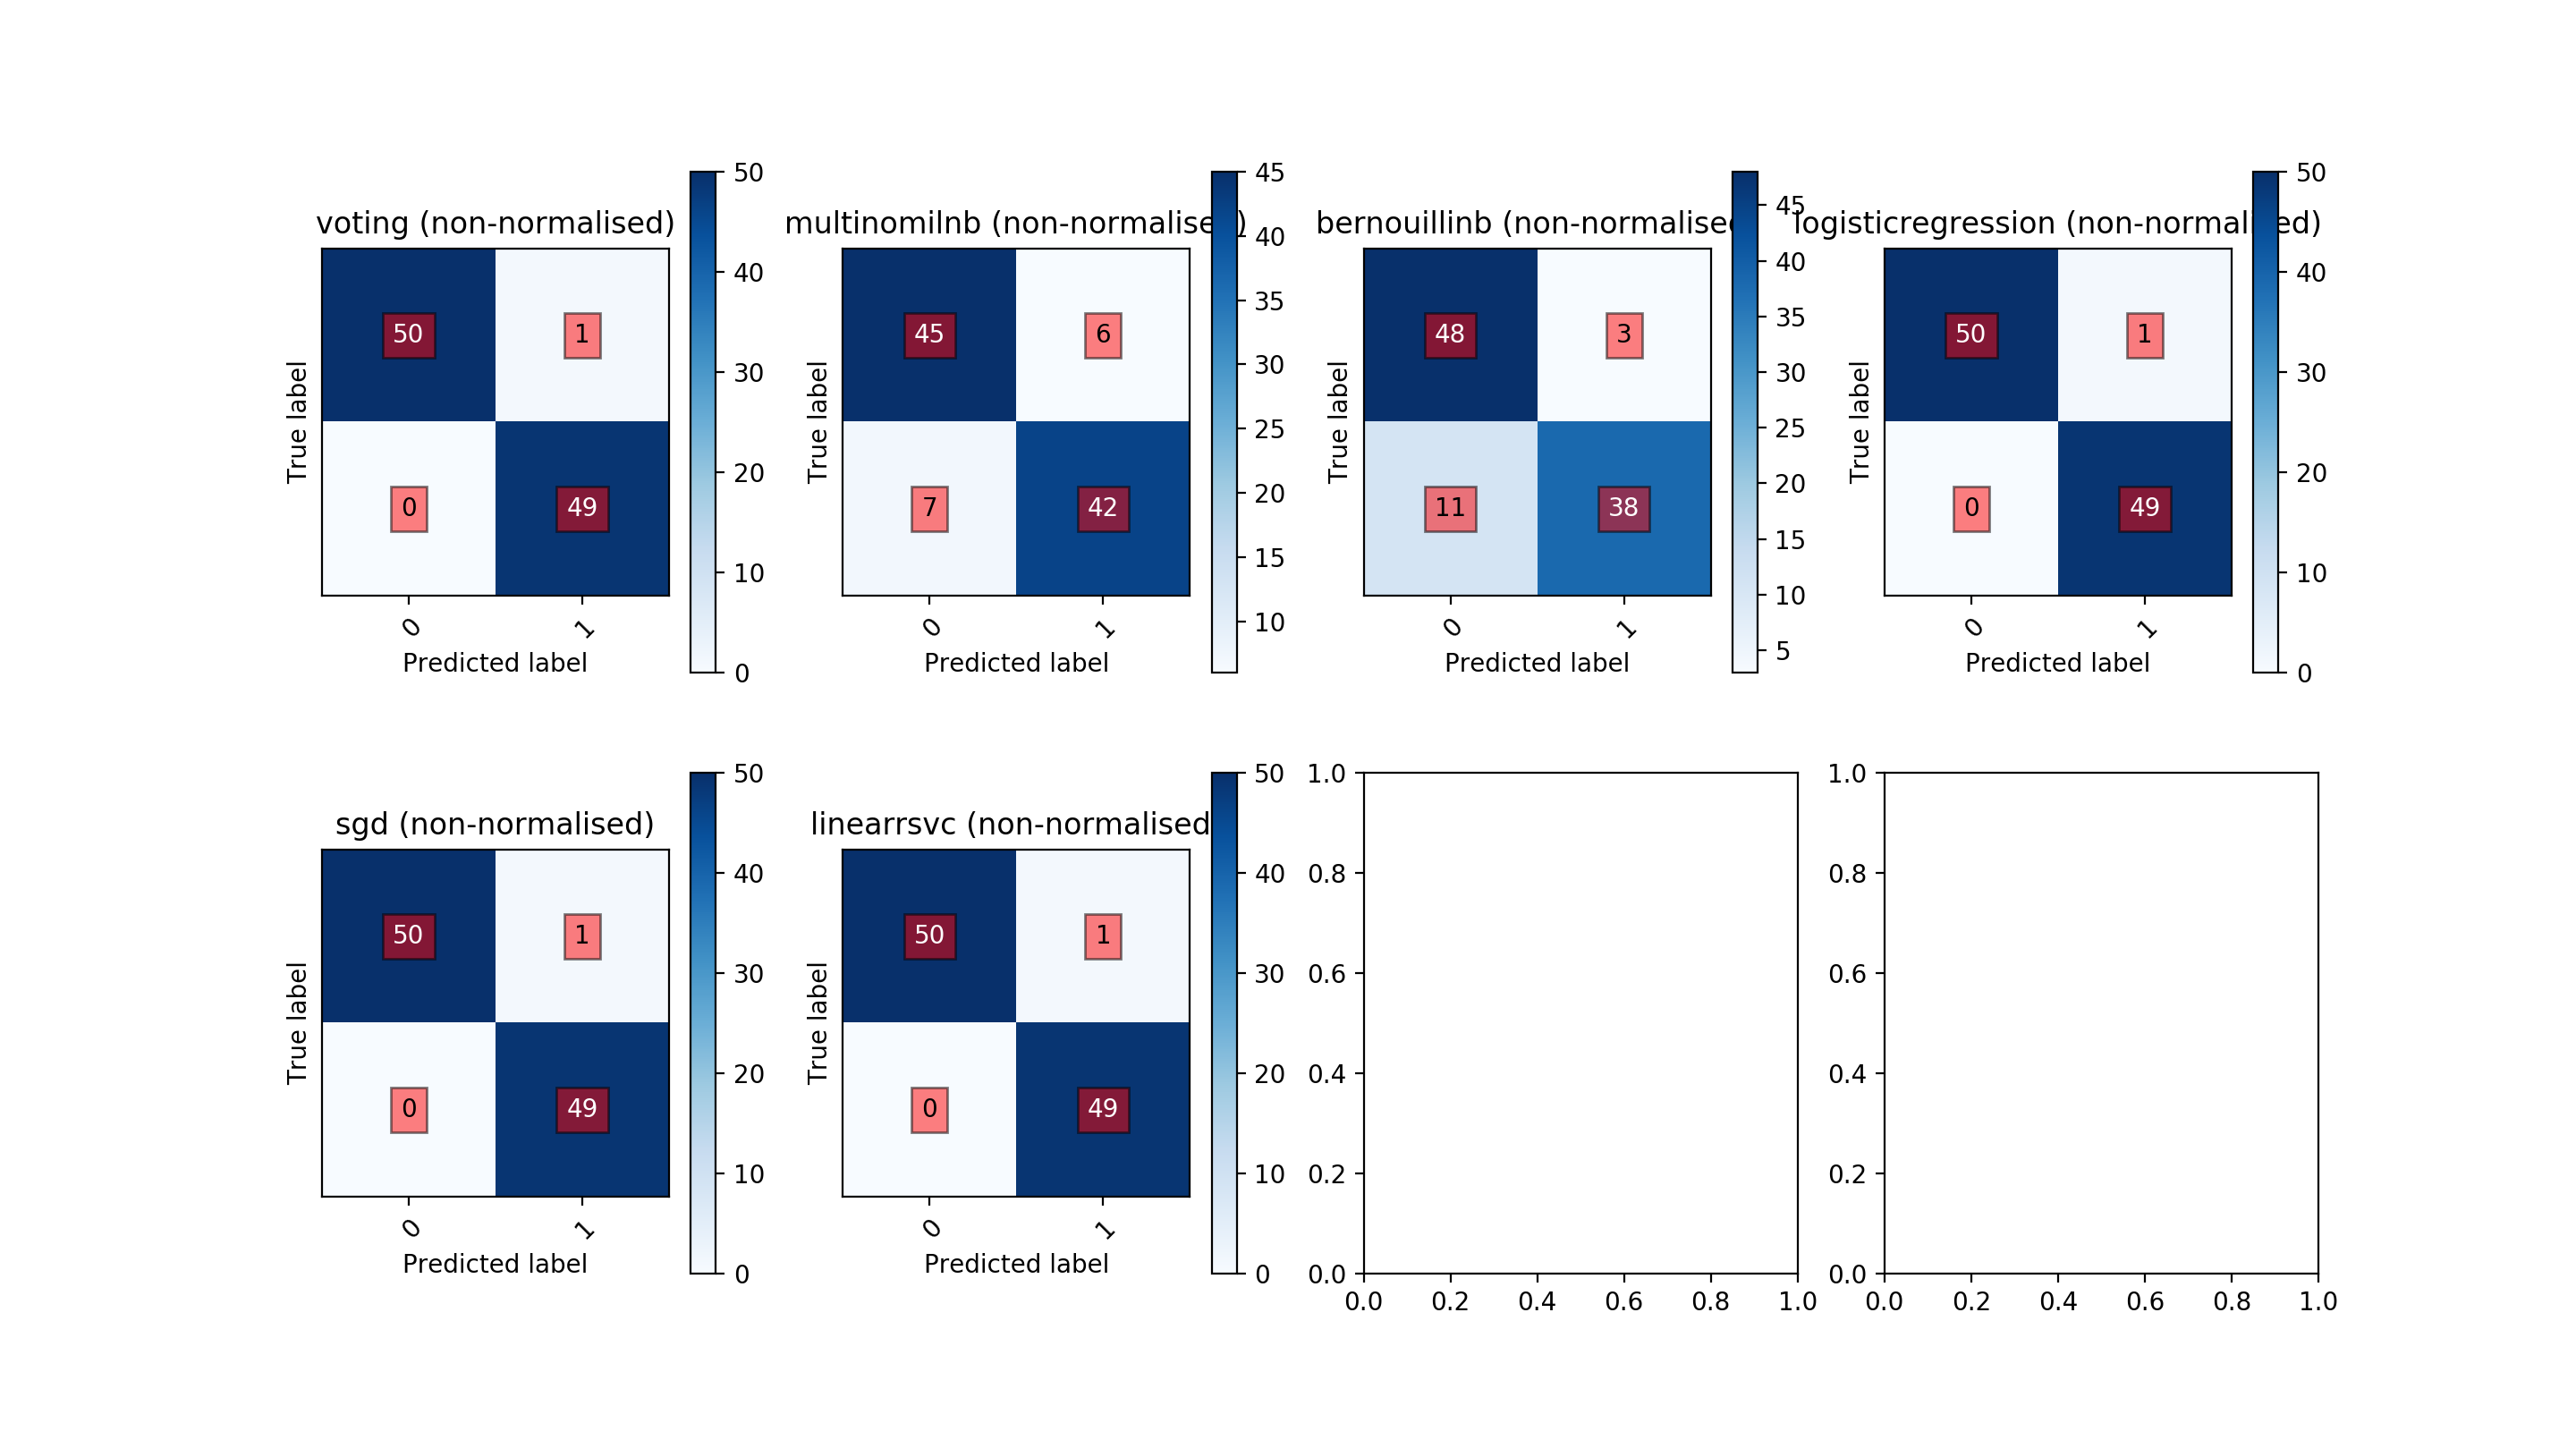
- report
- Build the classifier then run the classifier against some test data. A textual summary of the performance is printed. This is useful for evaluating how well the classifier is performing.
Metrics:
              precision    recall  f1-score   support

           0       1.00      1.00      1.00        50
           1       1.00      1.00      1.00        50

    accuracy                           1.00       100
   macro avg       1.00      1.00      1.00       100
weighted avg       1.00      1.00      1.00       100

Confusion matrix:
[[50  0]
 [ 0 50]]
- graphs
- Print a series of graphs summarising the behaviour of the classifier.
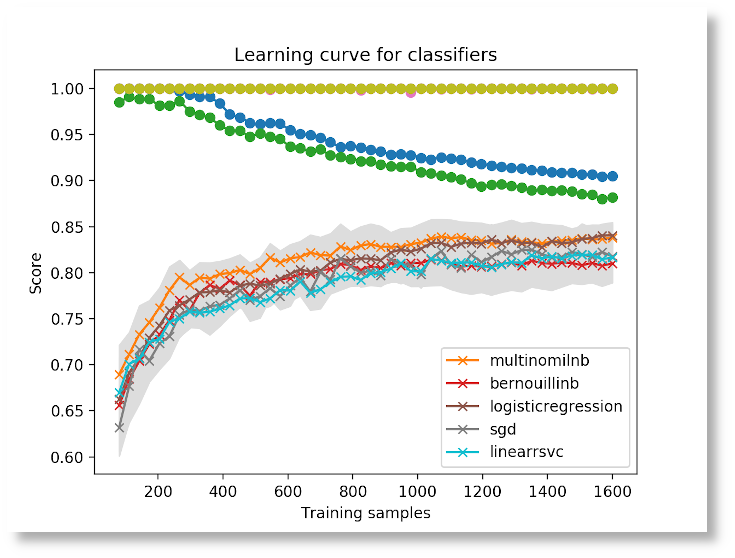
- learning
- Calculate learning curves for each of the sub-classifiers and plot the results. This shows how the performance of each classifier changes based on the number of training samples.
Text Classifier
A standalone program for classifying the sentiment of text using NLTK.
for example:
$ python twitter_ml/classify/classify_text.py --text "This is some negative text"
2019-10-18 13:34:33,791 - twitter_ml.classify.sentiment - INFO - Naive Bayes classifier from NLTK: neg
2019-10-18 13:34:33,808 - twitter_ml.classify.sentiment - INFO - Multinomial NB classifier from SciKit: neg
2019-10-18 13:34:33,826 - twitter_ml.classify.sentiment - INFO - Bernouilli NB classifier from SciKit: neg
2019-10-18 13:34:33,842 - twitter_ml.classify.sentiment - INFO - Logistic Regression classifier from SciKit: neg
2019-10-18 13:34:33,859 - twitter_ml.classify.sentiment - INFO - SGD classifier from SciKit: neg
2019-10-18 13:34:33,874 - twitter_ml.classify.sentiment - INFO - Linear SVC classifier from SciKit: neg
2019-10-18 13:34:34,076 - twitter_ml.classify.sentiment - INFO - Nu SVC classifier from SciKit: neg
2019-10-18 13:34:34,077 - twitter_ml.classify.sentiment - INFO - Voting Classifier: neg
Classification: neg; Confidence: 1.000000
or:
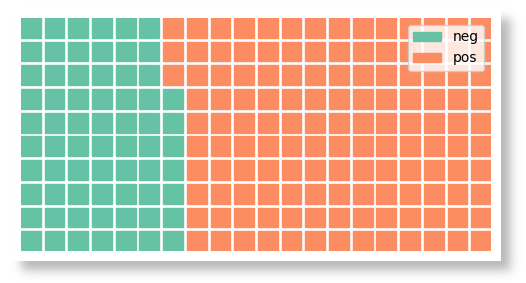
$ python twitter_ml/classify/classify_text.py --waffle --text "This is bad" "This is great" "And this is great as well"
will generate a waffle diagram summarising the results (in this case 25% negative, 75% positive).
or:
$ python twitter_ml/classify/classify_text.py --wordcloud --files tests/sample-text.txt
will classify the input files then generate a wordcloud summarising the most frequent words.

Document Scanner
Start the analysis job (SPARK_ROOT is the folder where you installed Spark; path-to-this-git-repo is the place you cloned this repository):
cd $SPARK_ROOT
bin/spark-submit path-to-this-git-repo/doc-scanner/scan-doc.py some-file-to-analyse
The program supports a number of command line arguments:
usage: scan-doc.py [-h] [-v] [-s] [-p] file

Spark program to process text files and analyse contents

positional arguments:
  file        file to process

optional arguments:
  -h, --help  show this help message and exit
  -v          verbose logging
  -s          strip stopwords
  -p          plot figure
Twitter-Kafka Publisher
The twitter client needs API keys to read from Twitter. Sign-up on the Twitter developer platform to get your own keys. Insert your API keys into the code.
- Start by running Zookeeper:
bin/zookeeper-server-start.sh config/zookeeper.properties
- Start the Kafka server:
bin/kafka-server-start.sh config/server.properties
- Create a Kafka topic (we only need to do this once):
bin/kafka-topics.sh --create --bootstrap-server localhost:9092 --replication-factor 1 --partitions 1 --topic brexit
bin/kafka-topics.sh --list --bootstrap-server localhost:9092
- Start the console listener (this is just to check Kafka is receiving tweets):
bin/kafka-console-consumer.sh --bootstrap-server localhost:9092 --topic brexit --from-beginning
- Start the Twitter producer:
python twitter-to-kafka.py
This will read tweets from Twitter and pump them into Kafka. It will also print the tweets to the console.
The Twitter Analyser
I had to define a variable to enable multi-threaded applications on a Mac (apparently due to security changes:
export OBJC_DISABLE_INITIALIZE_FORK_SAFETY=YES
- Start the analysis job (SPARK_ROOT is the folder where you installed Spark; path-to-this-git-repo is the place you cloned this repository):
cd $SPARK_ROOT
bin/spark-submit path-to-this-git-repo/twitter-stream-analyser/read-tweets-kafka.py
This will launch the Spark platform in standalone mode and submit the python job. This job reads tweets from Kafka.
Running from PyCharm
This blog has some useful information on running Spark jobs from PyCharm.
In summary:
- Edit your
.profile(or.bash_profile, or whatever) to add theSPARK_HOMEandPYTHONPATHsettings) - Add the Hadoop python libraries to the PyCharm project interpreter settings
- Edit
$SPARK_HOME/conf/spark-default.confto include the line:
spark.jars.packages org.apache.spark:spark-streaming-kafka-0-8-assembly_2.11:2.4.0
Note: the actual version settings depend on the version of Spark (2.4.0), the version of Scala (2.11) and Kafka. If you try running your Spark program, it will print an error message that tells you which version to add. This will be used to download the relevent JARs from Maven the first time you run the code.